


Table of contents
Introduction:-
In this article, We are going to see the all basic concepts of the ReplicaSet and Deployment like what is the actual difference between the ReplicaSet and deployment in Kubernetes?, how the deployment plays an important role in the updates?
From this article, you will get to learn how to create YAML manifest for ReplicaSet and Deployment from scratch. Apart from this, you will get a hands-on experience of working with different kubectl commands step by step. So read this article till end and also do practice on the demo.
ReplicaSet:-
What is ReplicaSet ?
Before going further, let's understand what is this ReplicaSet.
As the name suggests, ReplicaSet is nothing but the copies/replicas of the pod. ReplicaSet comes with the capabilities to maintain the desired numbers of pods running at all time. By using ReplicaSet we can create, update and maintain the multiple running instances of our application as per the requirement.
Why ReplicaSet ?
Let's start with a real scenario, when we deploy our application for obvious reason we deploy multiple instances of our application (As per the load on the application). In Kubernetes, we are working with the pods as we all know pod is the smallest unit in Kubernetes having one or more containers are running in it. If you don't know anything about the pods, I will recommend you to go through this article first 👉 pods in Kubernetes.
Suppose we deployed only one pod of the application and by chance it will fail after the deployment, then the application is no longer accessible to the user. So to keep the desired instances running, we required to go with the ReplicaSet.
How to write manifest file for Replicaset ?
YAML file for Pod:-
Before going to any further discussion, we will see how to create the YAML manifest for creating pod. Let's understand the basics of YAML for Replica-Set:-
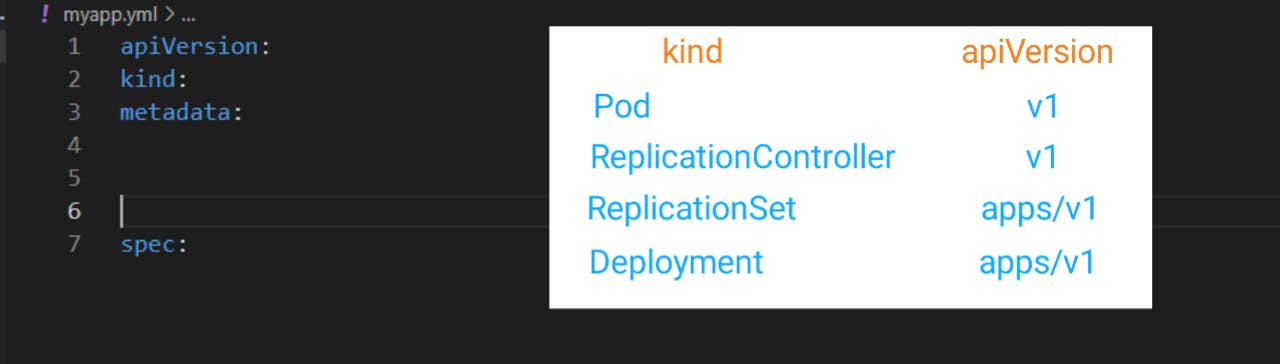
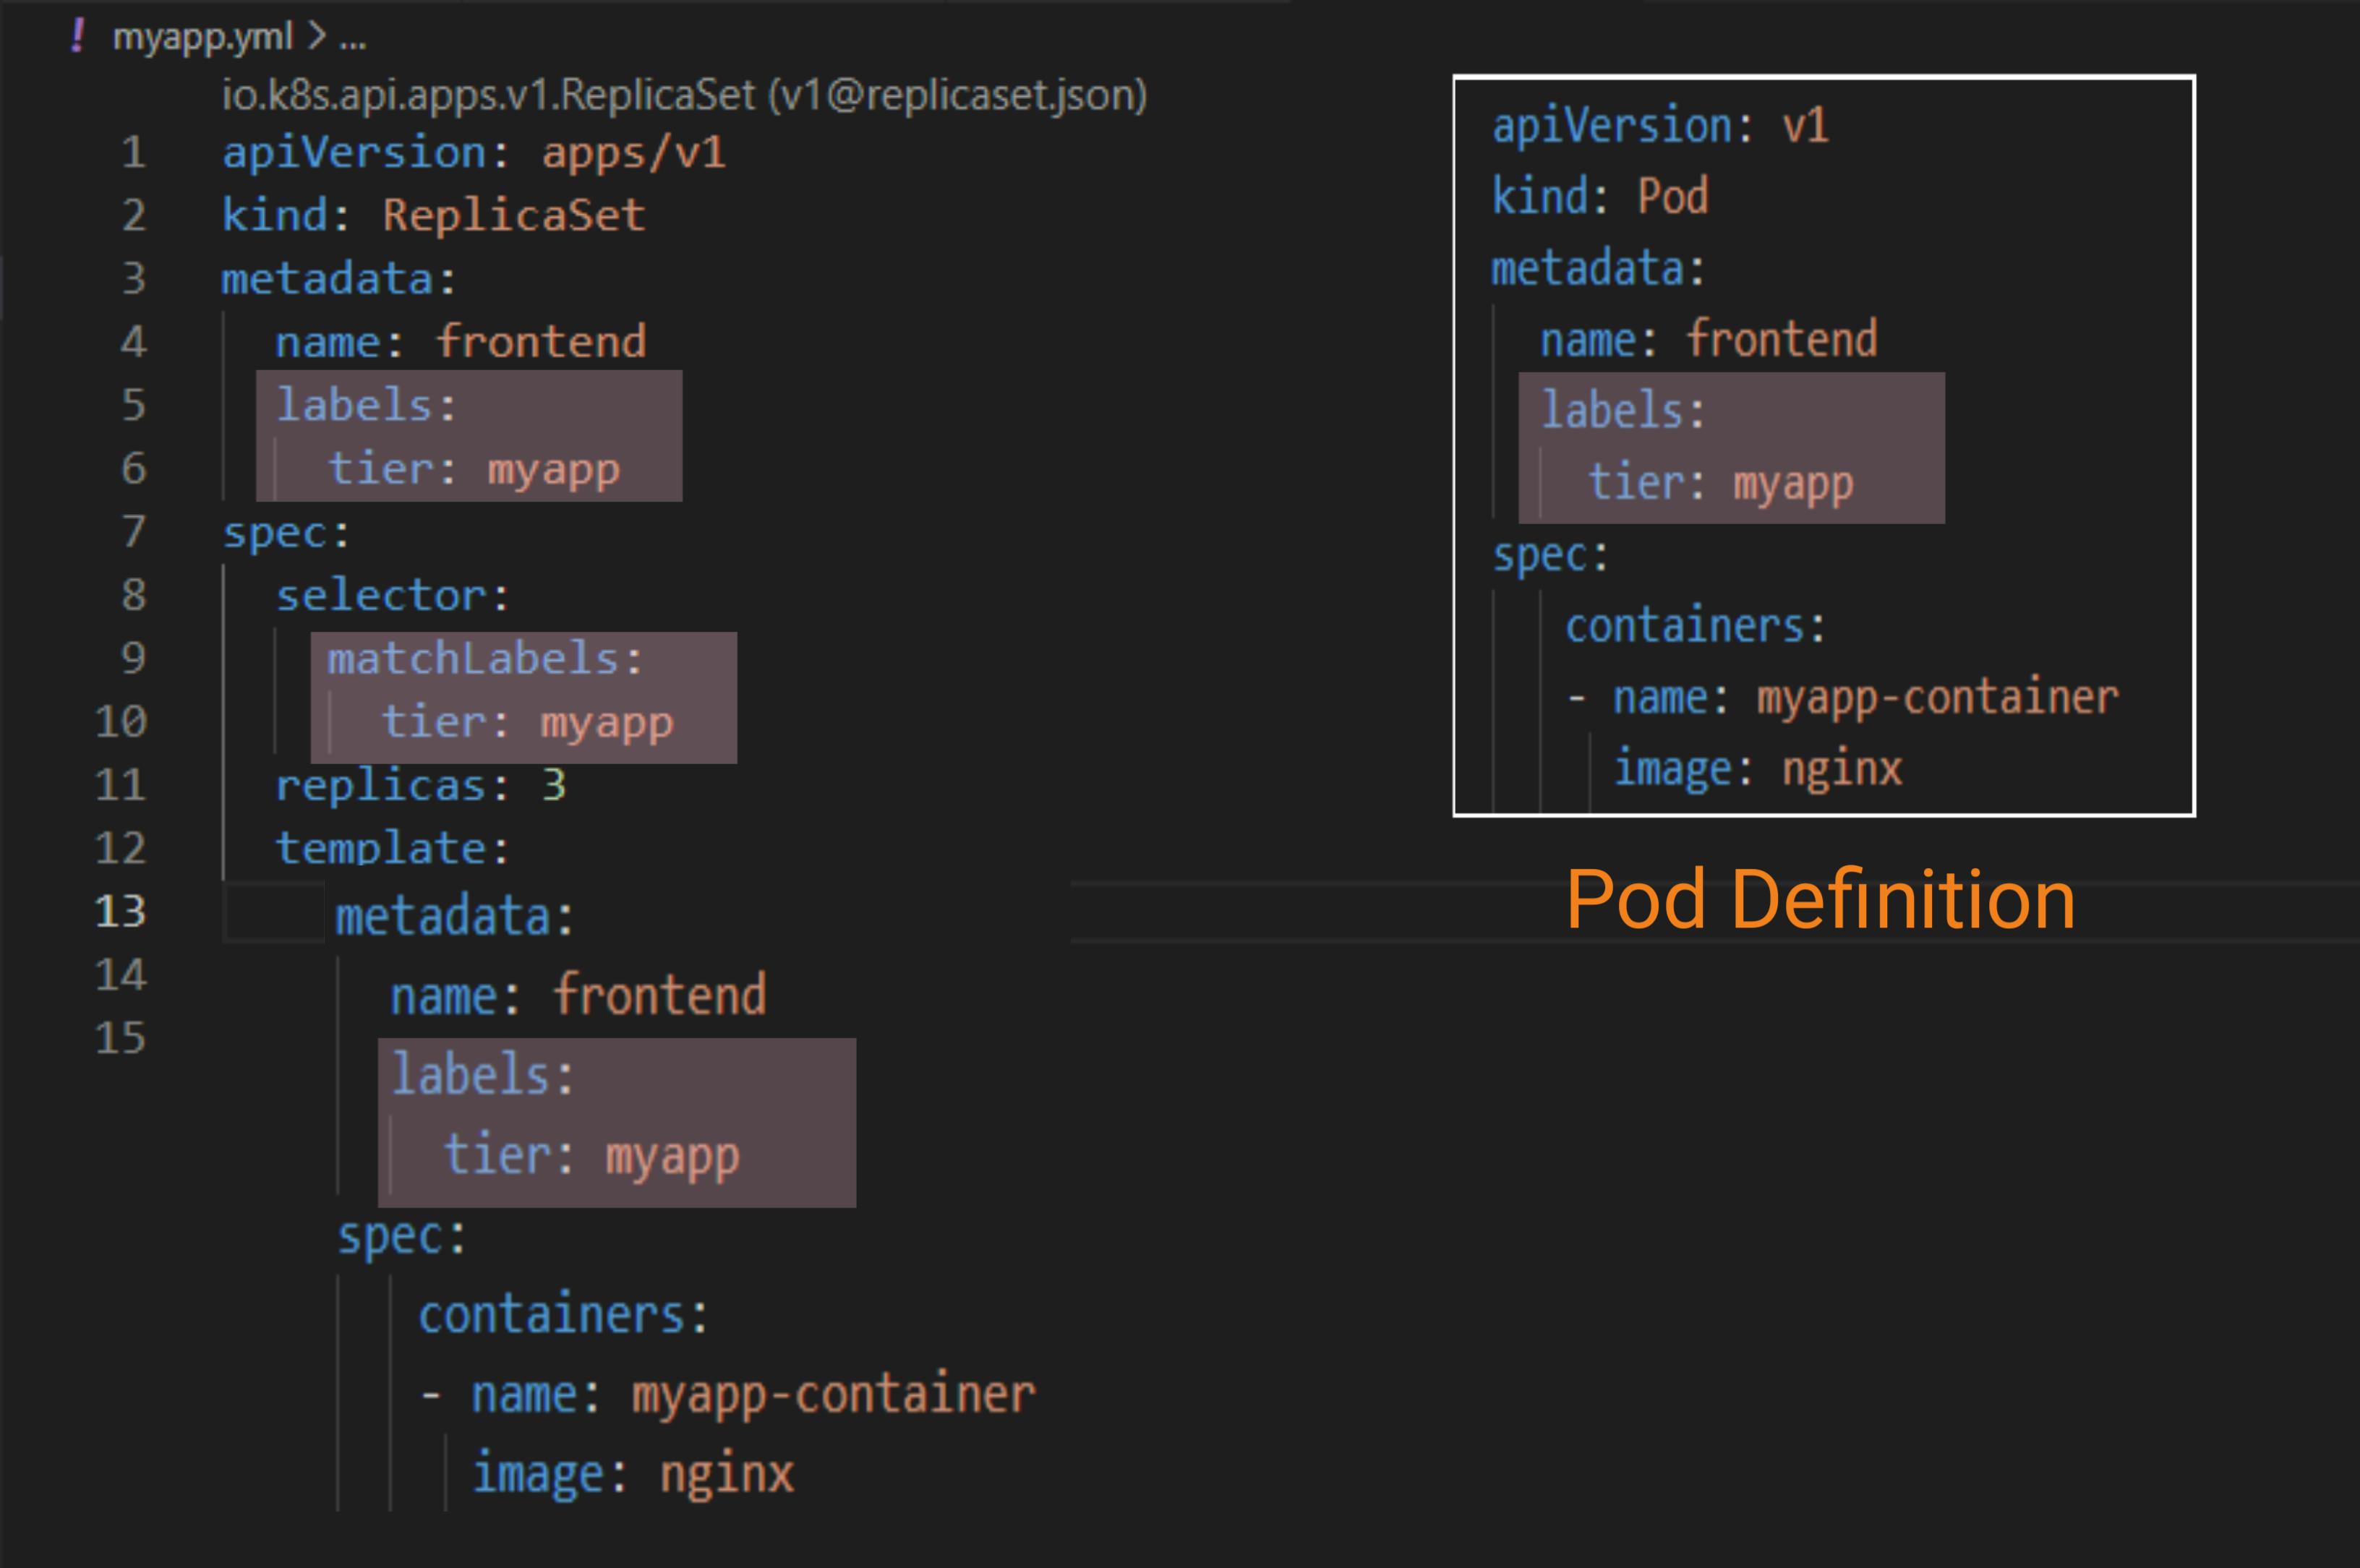
As shown in above picture, apiVersion and kind mentioned for creating different Kubernetes object. apiVersion indicates that which version of API you are using to create the object, and kind indicates that what kind of object you want to prepare. In our demo firstly we are creating the manifest for pod because once you understand the pod manifest then further things are much easier to understand. So for creating Pod, apiVersion we are going to use is v1 and kind is Pod. In metadata section, we required to mention the further things related to pod like name of pod, labels for pod etc. The labels play a much more important role in creating the ReplicaSet of pod. In spec section, we require mentioning the definition of containers like name of container and image on which we want to create container. In simple words, spec section is the section of lists of dictionaries.
apiVersion: v1
kind: Pod
metadata:
  name: frontend
  labels:
    tier: myapp
spec:
   containers:
   - name: myapp-container
     image: nginx
The above snippet shows the basic required manifest to create the pod.
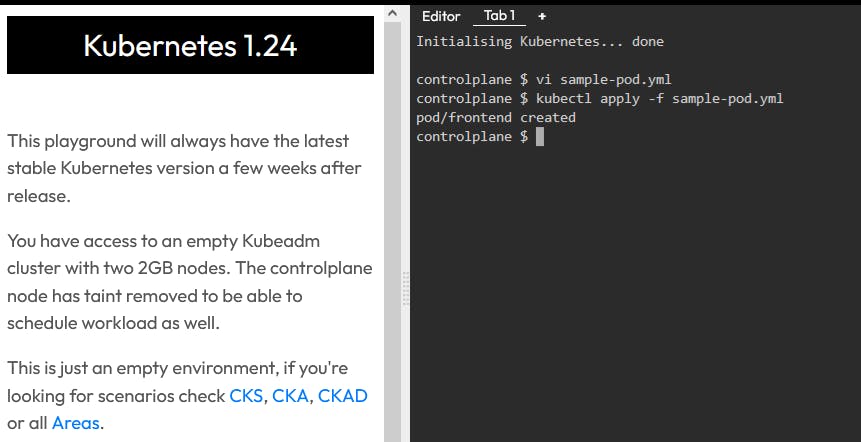
If you want to do hands on demo in the environment of the Kubernetes then visit this link, it's free to use 👇
For creating the pod by declarative way, open vim in the shell. For this use, the following instruction:-
vi sample-pod.yml
Then press i it will enable editing in the file and simply paste the above manifest snippet.
Then press ctrl + Esc or ctrl +c, it will disable the editing in vim editor then press :wq + Enter it will automatically save file and exit from the editor. And use below command, it will create your first pod in Kubernetes.
Creating Pod from YAML file:-
kubectl apply -f sample-pod.yml
YAML manifest for ReplicaSet:-
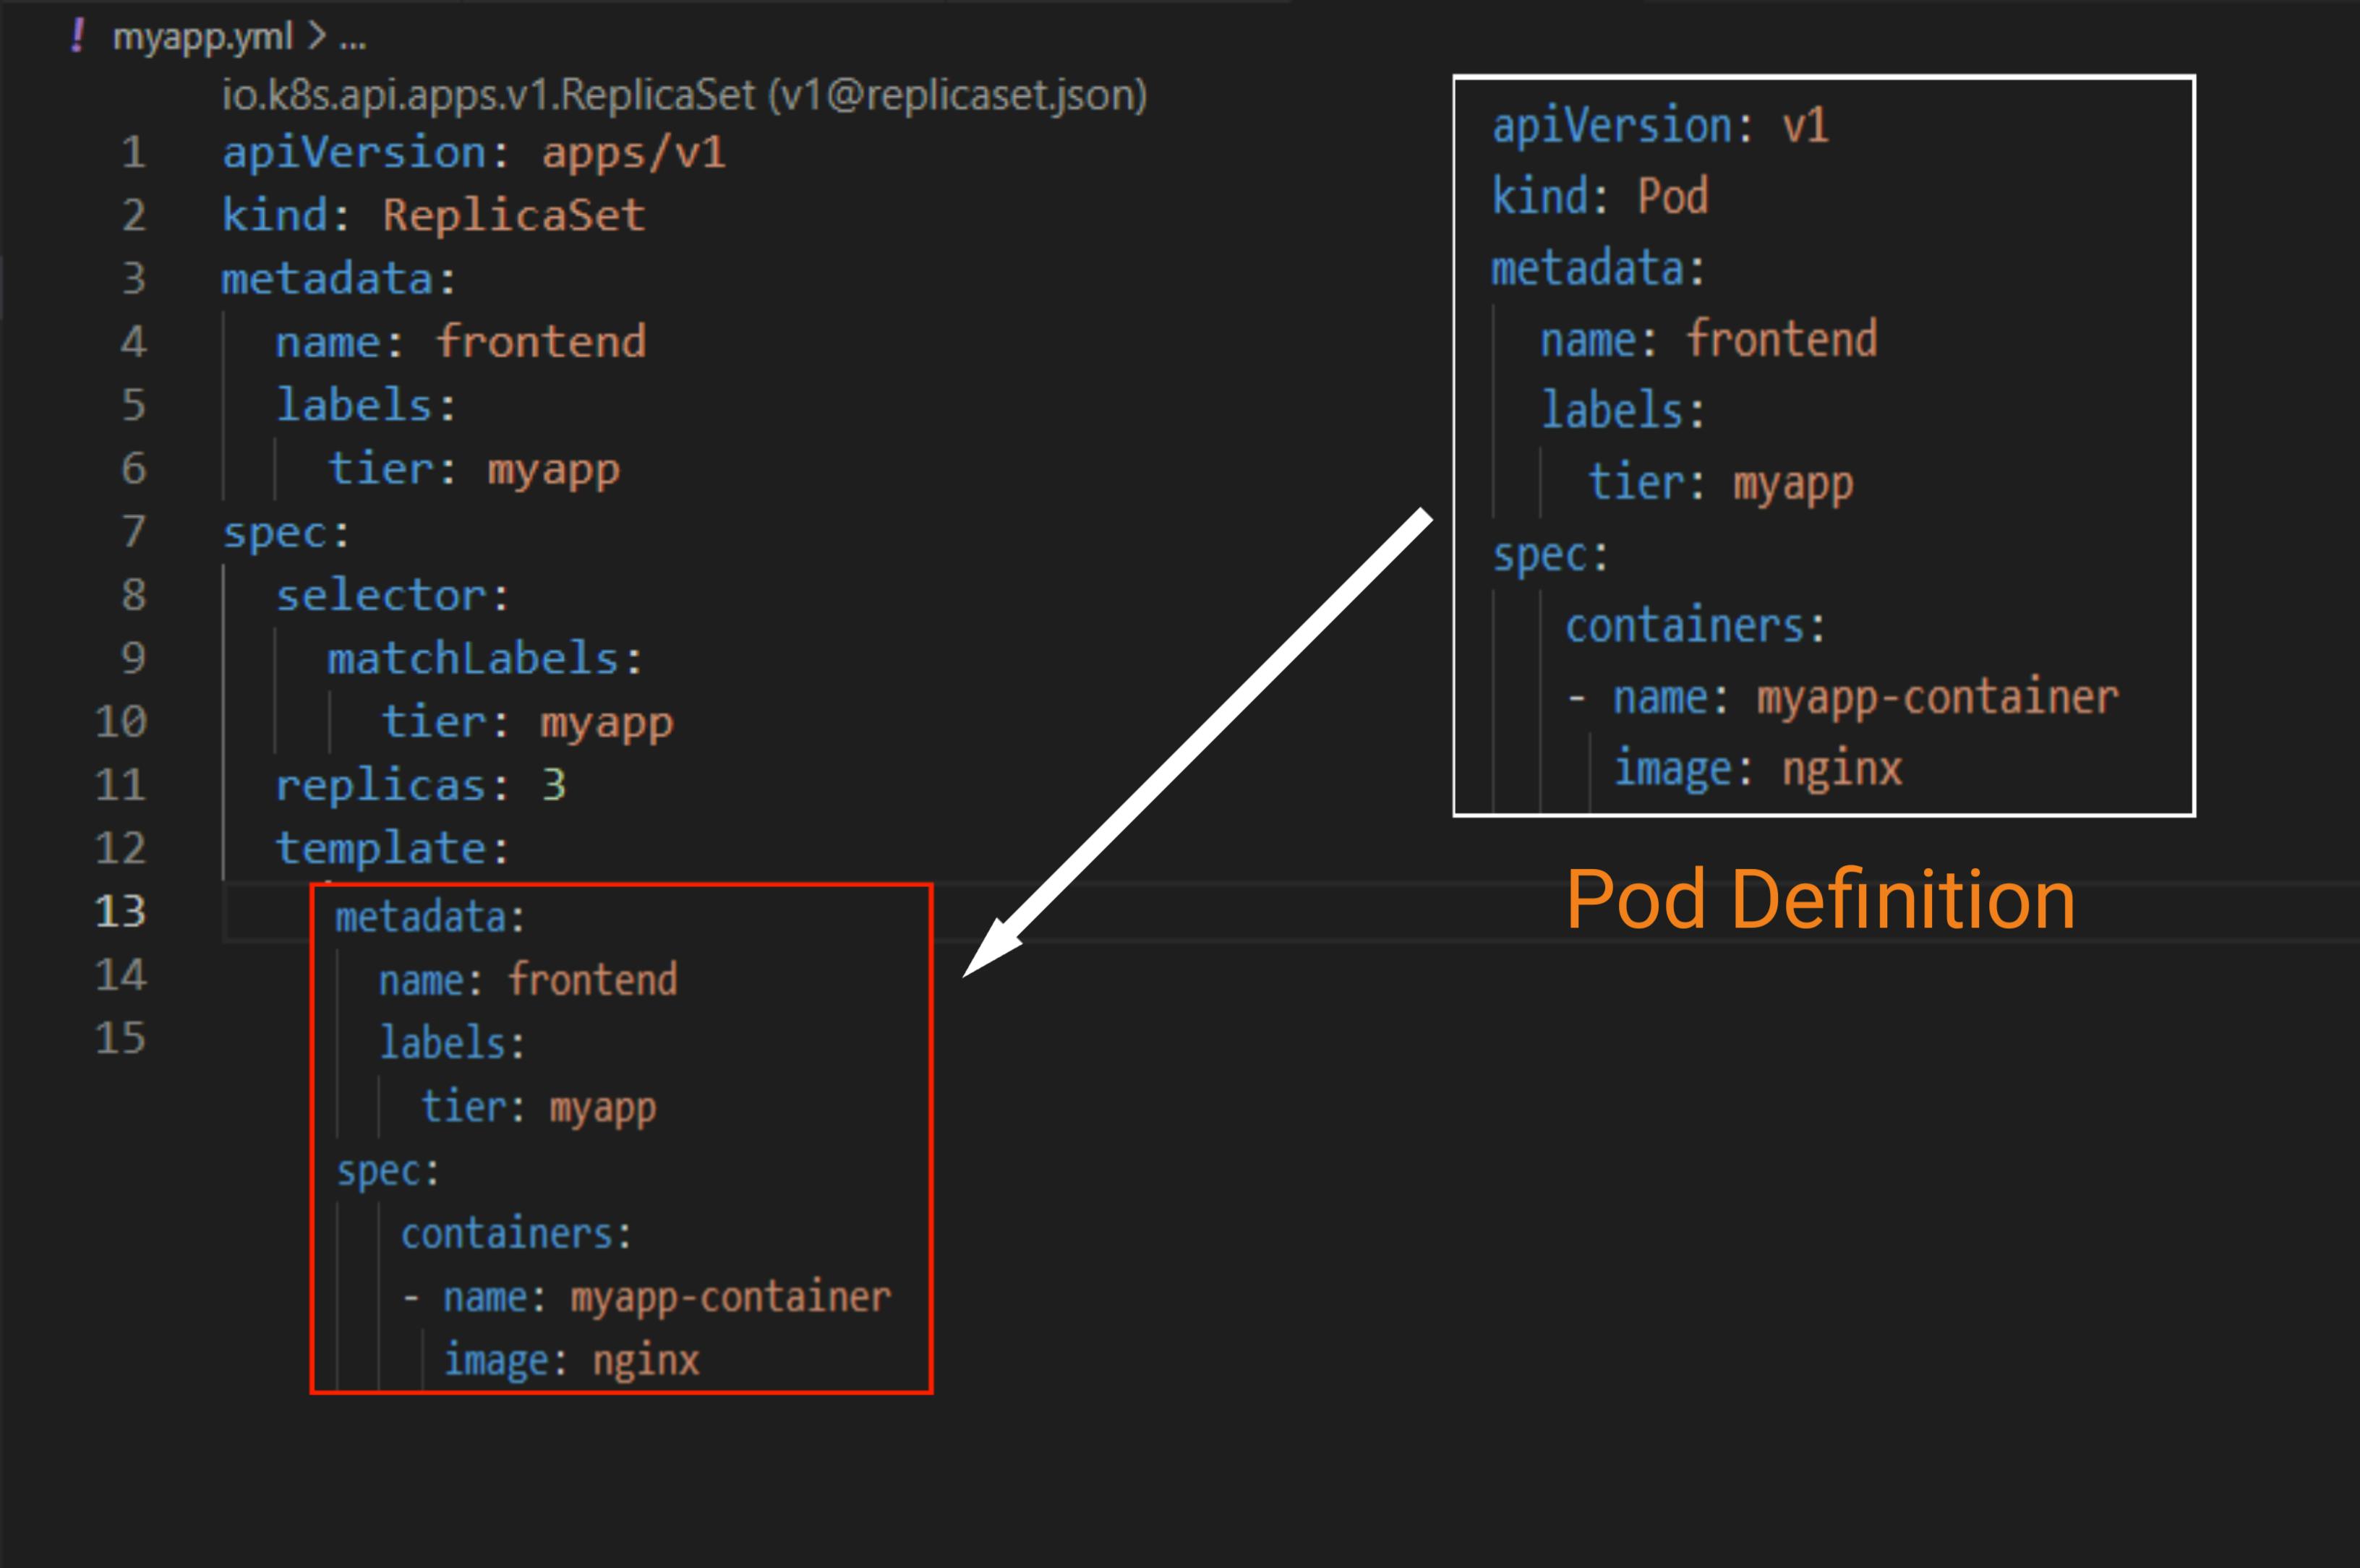
Now I will tell you how to create YAML file for ReplicaSet from pod manifest by doing some minor changes.
- First change the
apiVersionandkindas per above picture.
Then in
specsection we required to provideselectorwhich have thematchLabelsattribute and value of thislabelsshould match with the value of labels inside themetadatasection.Then mention how many instances do you want of your application inside the replicas.
And finally, we required to provide the template to create the pods. From pod manifest, copy whole things except
apiVersionandkindand paste it intemplatesection ofReplicaSetmanifest.
- Make sure that all indentation should be proper, and the labels also match with each other.
Creating ReplicaSet From YAML Manifest:-
- Copy and paste this code for demo purpose 👇
apiVersion: apps/v1
kind: ReplicaSet
metadata:
  name: frontend
  labels:
    tier: myapp
spec:
  selector:
    matchLabels:
      tier: myapp
  replicas: 3
  template:
    metadata:
      name: frontend
      labels:
        tier: myapp
    spec:
      containers:
      - name: myapp-container
        image: nginx
- now use the below command to create
ReplicaSet👇
kubectl apply -f replicaset-demo.yml
- It will create the replicas as mentioned in the manifest. The below picture shows the desired and running status of Pod.

Testing The Capability of ReplicaSet:-
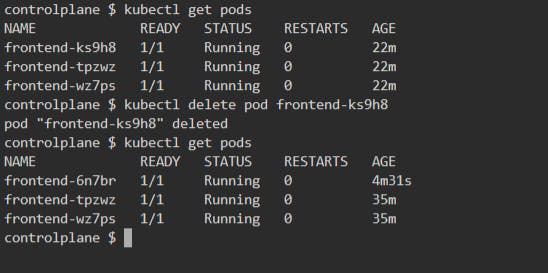
- Now for testing the capability of
ReplicaSetas we already discussed that if one of the pod is fail, then it will recreate the newer pod to maintain the desired state of replicas. We try this by deleting one of the pod from this replicas.
- List the pods first
kubectl get pods - now delete pod from one of them
kubectl delete pod <pod-name>
Why not to use ReplicaSet Approach Directly?
We saw some benefits of ReplicaSet about how it does it's work of maintaining the pod replicas. But in real scenario after a certain time in our application we require to make some changes like versioning of the image, changing the labels etc. We will make this changes as per our need. But in ReplicaSet when we do versioning i.t. changing the version of image. Then ReplicaSet first delete all the instances of our application, then re-create it. Hence, what happen is that in between deletion and re-creation process of pods, our application isn't accessible to the user. Because of this, we should avoid this approach.
Let's see this with a small demo replace the below version of nginx image to the nginx:1.22-perl or you can provide any down version of nginx.
containers:
      - name: myapp-container
        image: nginx:1.22-perl
Then use the below command to re-configure the ReplicaSet
kubectl apply -f replicaset-demo.yml
After applying the above command, it will re-configure the image version. To see the more details about the ReplicaSet use below command.
kubectl describe replicaset.apps/frontend
This will provide all the information's related to the update strategy, desired and running status of pods and what events are happened while re-configuring the ReplicaSet and we will get this scaling information as well in the form of messages.
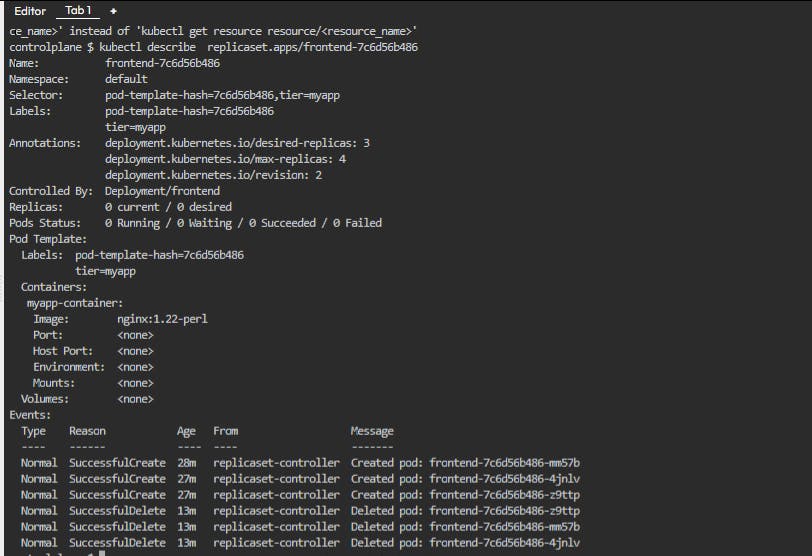
From above picture It is concluded that ReplicaSet first delete all the pods then re-create
the all pods with version mentioned in spec section. Hence, the time lag between the deletion and creation of pods is called the inaccessible time of application. Because of this
we should look for Deployment.
Cleanup Resources:-
Use the below command to delete all the replicas of the application, it will also delete all the pods associated with it.
kubectl delete -f replicaset-demo.yml
Deployment:-
What is Deployment ?
Deployment is somehow similar to the ReplicaSet but it runs higher in the hierarchy.
Deployment works in the top of ReplicaSet and it internally manages the replicas.
We already discuss the drawback of ReplicaSet and this drawback is overcome by using the deployment. The main capability of Deployment is rolling updates & scaling of the application.
Why Deployment ?
Whenever we try to update our application, then deployment does this work by updating one by one pod without stopping the access of end user to the application. This is the default approach in the Kubernetes. As we have already seen in ReplicaSet it first terminates all the instances then re-create it, so end user is unable to access the application & deployment follows rolling updates so user always able to access the application. Because of this, it is mostly preferred over the ReplicaSet.
How to write YAML manifest for Deployment?
We already learned many things about the ReplicaSet, If you were able to write the manifest for ReplicaSet then it is much easier for you guys to make the manifest file for Deployment.
Do only one change in kind, instead of ReplicaSet replace it by Deployment and keep other things as it is.
apiVersion: apps/v1
kind: Deployment
metadata:
  name: frontend
  labels:
    tier: myapp
spec:
  selector:
    matchLabels:
      tier: myapp
  replicas: 3
  template:
    metadata:
      name: frontend
      labels:
        tier: myapp
    spec:
      containers:
      - name: myapp-container
        image: nginx
Create Deployment:-
Just paste the above snippet and apply the below command, it will create the deployment.
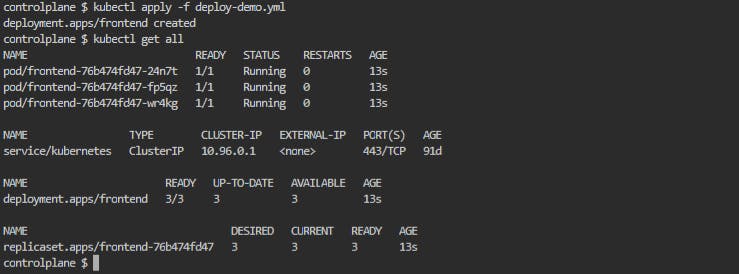
kubectl apply -f deploy-demo.yml
As deployment internally creates pods and ReplicaSet to see this use below command
kubectl get all
My window now look like this 👇, Which is having total 3 pods, one internal Kubernetes service and deployment which we right now created having all three containers are in running state.
Rolling Updates:-
As we already saw the demo of ReplicaSet where we made changes in the image version of nginx. From ReplicaSet we were concluded that when we try to make any changes in pod like versioning, changes in labels then it deleted the all instances of application then it re-create it. To avoid this scenario, we use deployments because it provides us rolling updates that means our all instances are not going to down at a time, it will scale up/down the application one by one.
Now to see this in demo, just make the below-mentioned changes in your deployment manifest file and again re-configure your deployment. Paste the below code in spec section, here we are trying to lower the version of nginx image.
containers:
      - name: myapp-container
        image: nginx:1.22-perl
After making the above-mentioned changes in the manifest file, use the below command to re-configure the deployment.
kubectl apply -f deploy-demo.yml
Then use the below command to see the internal events that is how it creates the pods, replicas and also changes the version of the image. But to observe the rolling update events properly, use this command twice or thrice.
kubectl describe deployment
Below picture shows the various event logs of the deployments such as Update Strategy type, updated version of the image and old ReplicaSet and new ReplicaSet status.
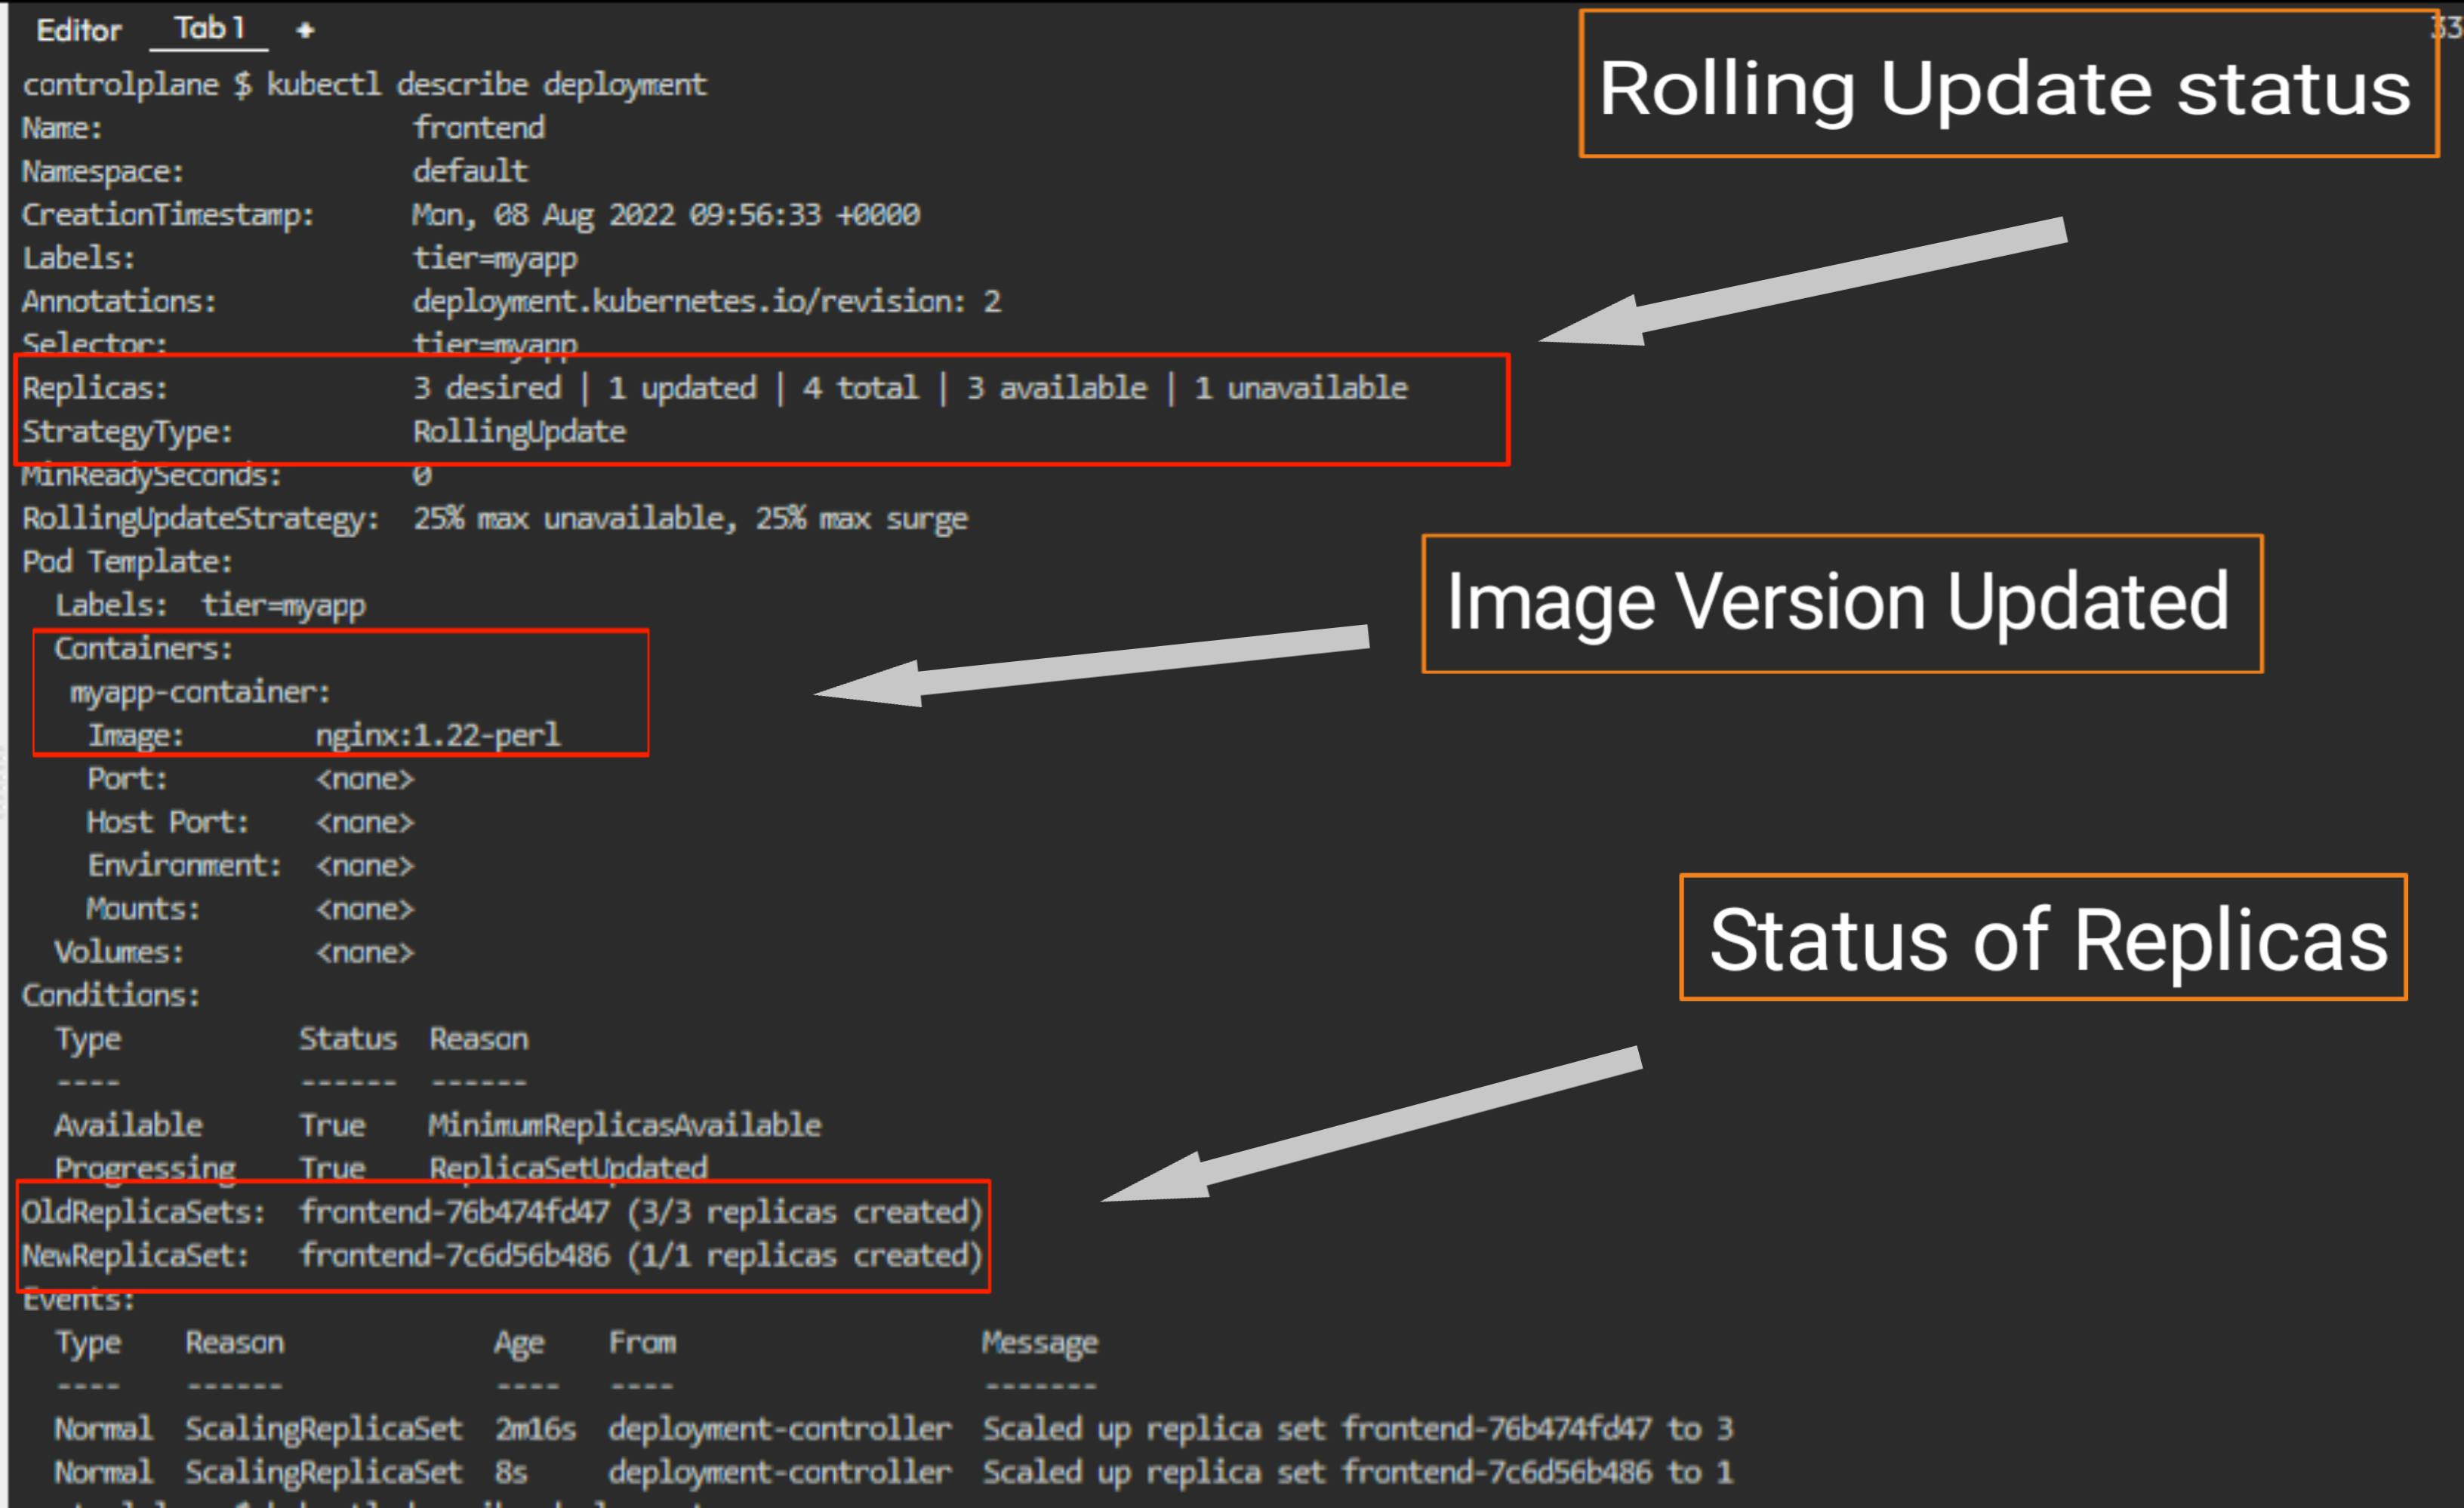
In current status of the deployment here, only one pod is updated with image version nginx:1.22-perl but remaining desired 2 pods are still running to the latest version of nginx.
It can be clearly observed from the event message. Here we are not working on the rolling update strategy , we keep it as it is by-default.
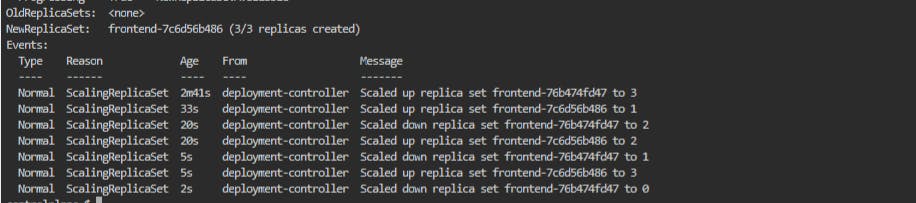
The above picture, shows the final events of deployment where all the all old replica-sets are scaled down and new replica-sets are scaled up without immediate terminating of pods, that is one by one manner.
Rollout Deployment:-
If the updated version is facing any issues or if you don't want changes, then it is possible to rollback all the changes. Use the below command to make this happen.
kubectl rollout undo deployment.apps/frontend
Cleanup Resources:-
To delete the deployment use below command, it will delete all the pods and ReplicaSet associated with it.
kubectl delete -f deploy-demo.yml
Conclusion:-
- Even we can deploy the pods directly but working with pod is too dangerous because in running state we can't make the multiple instances of the application & can't changes version of the images.
- Apart from this, pods do not have any self-healing characteristics, but working with
ReplicaSetandDeploymentit's possible to achieve self-healing. So, if pods goes down,ReplicaSetcontroller andDeploymentcontroller will try to revive the pods. However, make changes in the version and creating multiple instances of application is possible by the
ReplicaSetwe can manage these numbers i.t scaling of the pods and scaling down the pods at run time, butReplicaSetis not good for versioning.Finally talking about the
Deployment, it is more efficient to work with deployment as it keeps our application up and running during the versioning, it keeps our application accessibly to the used in every aspect of work.